Dome operator manual
For anyone running a show, lecture, meeting or event in the dome — not only technicians. It covers the Dome Control panel, the normal sequence from opening the room to closing it, and what to do if something goes wrong with an audience present.
For a public film screening, follow this manual together with the Film screening routine, which adds the admission, presentation and dismissal steps.
Almost everything in the dome is controlled from the Dome Control panel — on the iPad, or on the screens in the control booth. Only go to a PDU, a projector web interface or a render node when the panel cannot do what you need.
The Dome Control panel
The panel has the same seven tabs wherever it runs:
| Tab | What it controls |
|---|---|
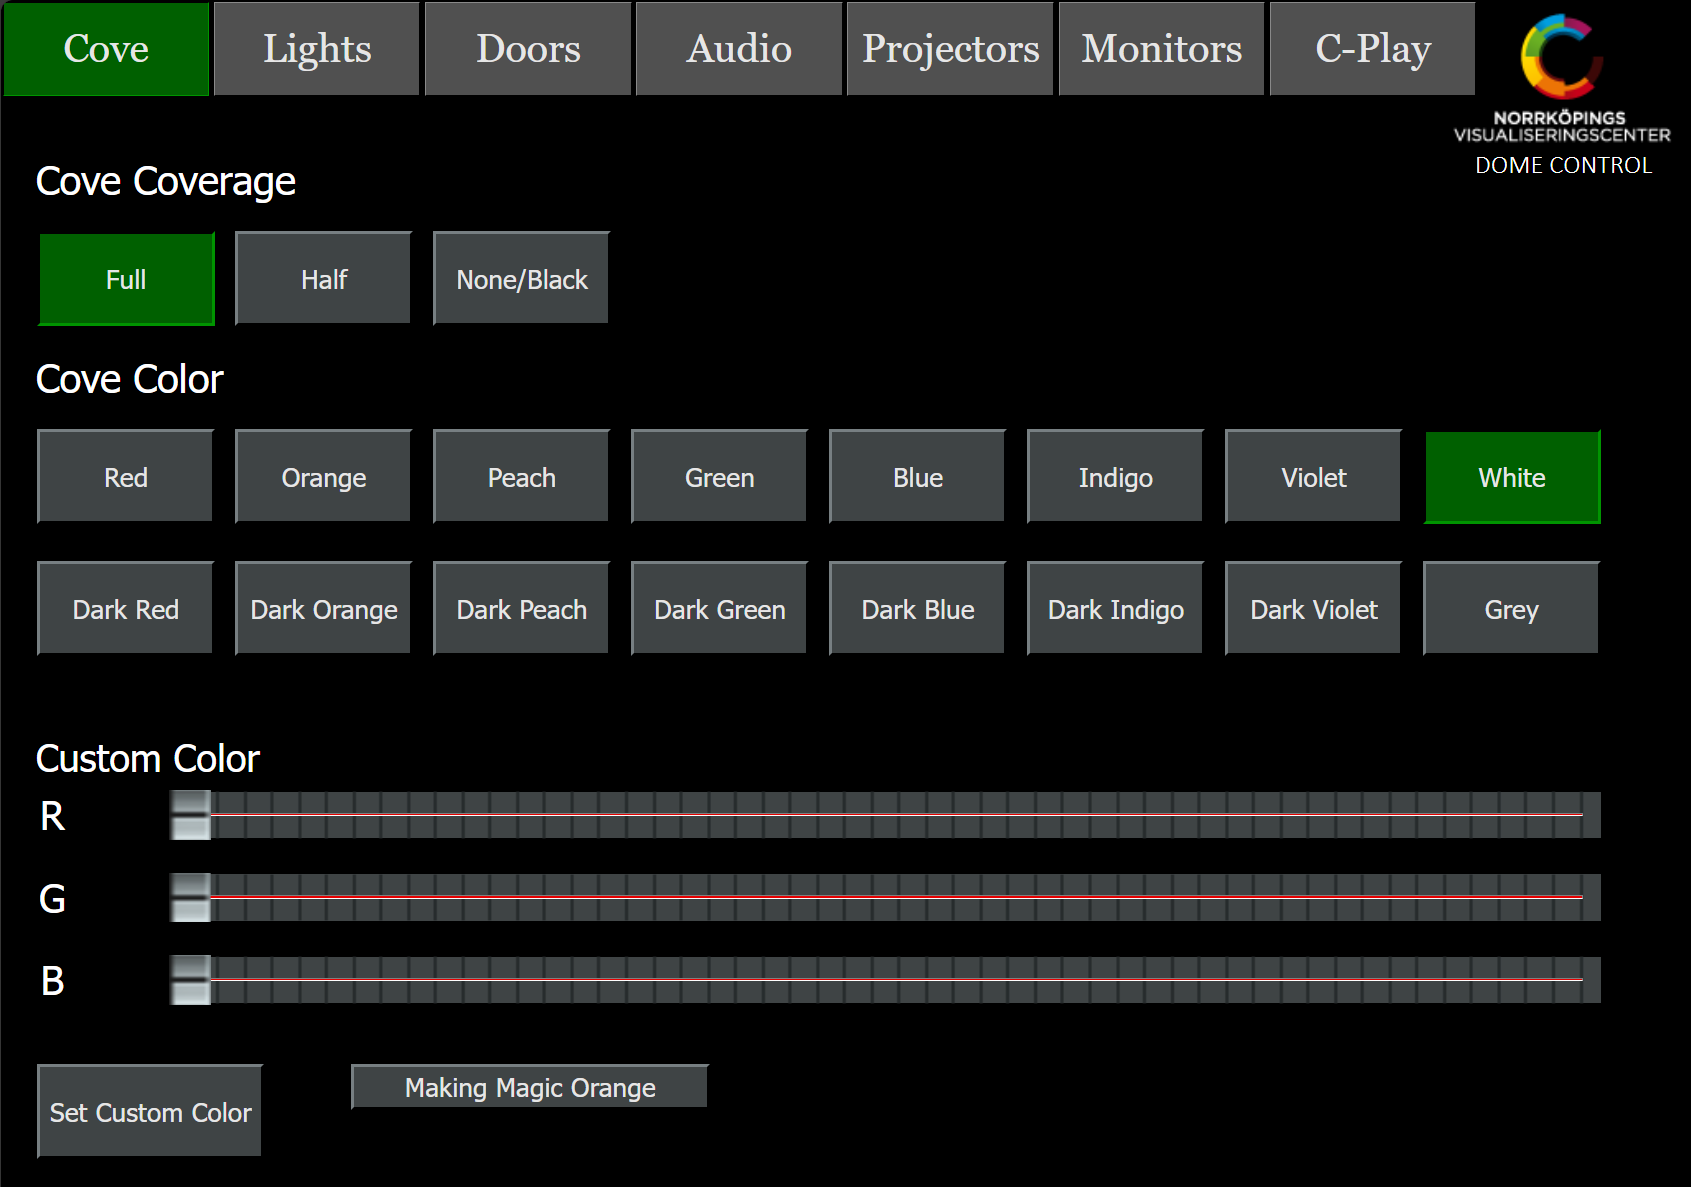
| Cove | Dome/ceiling cove lighting — coverage and colour |
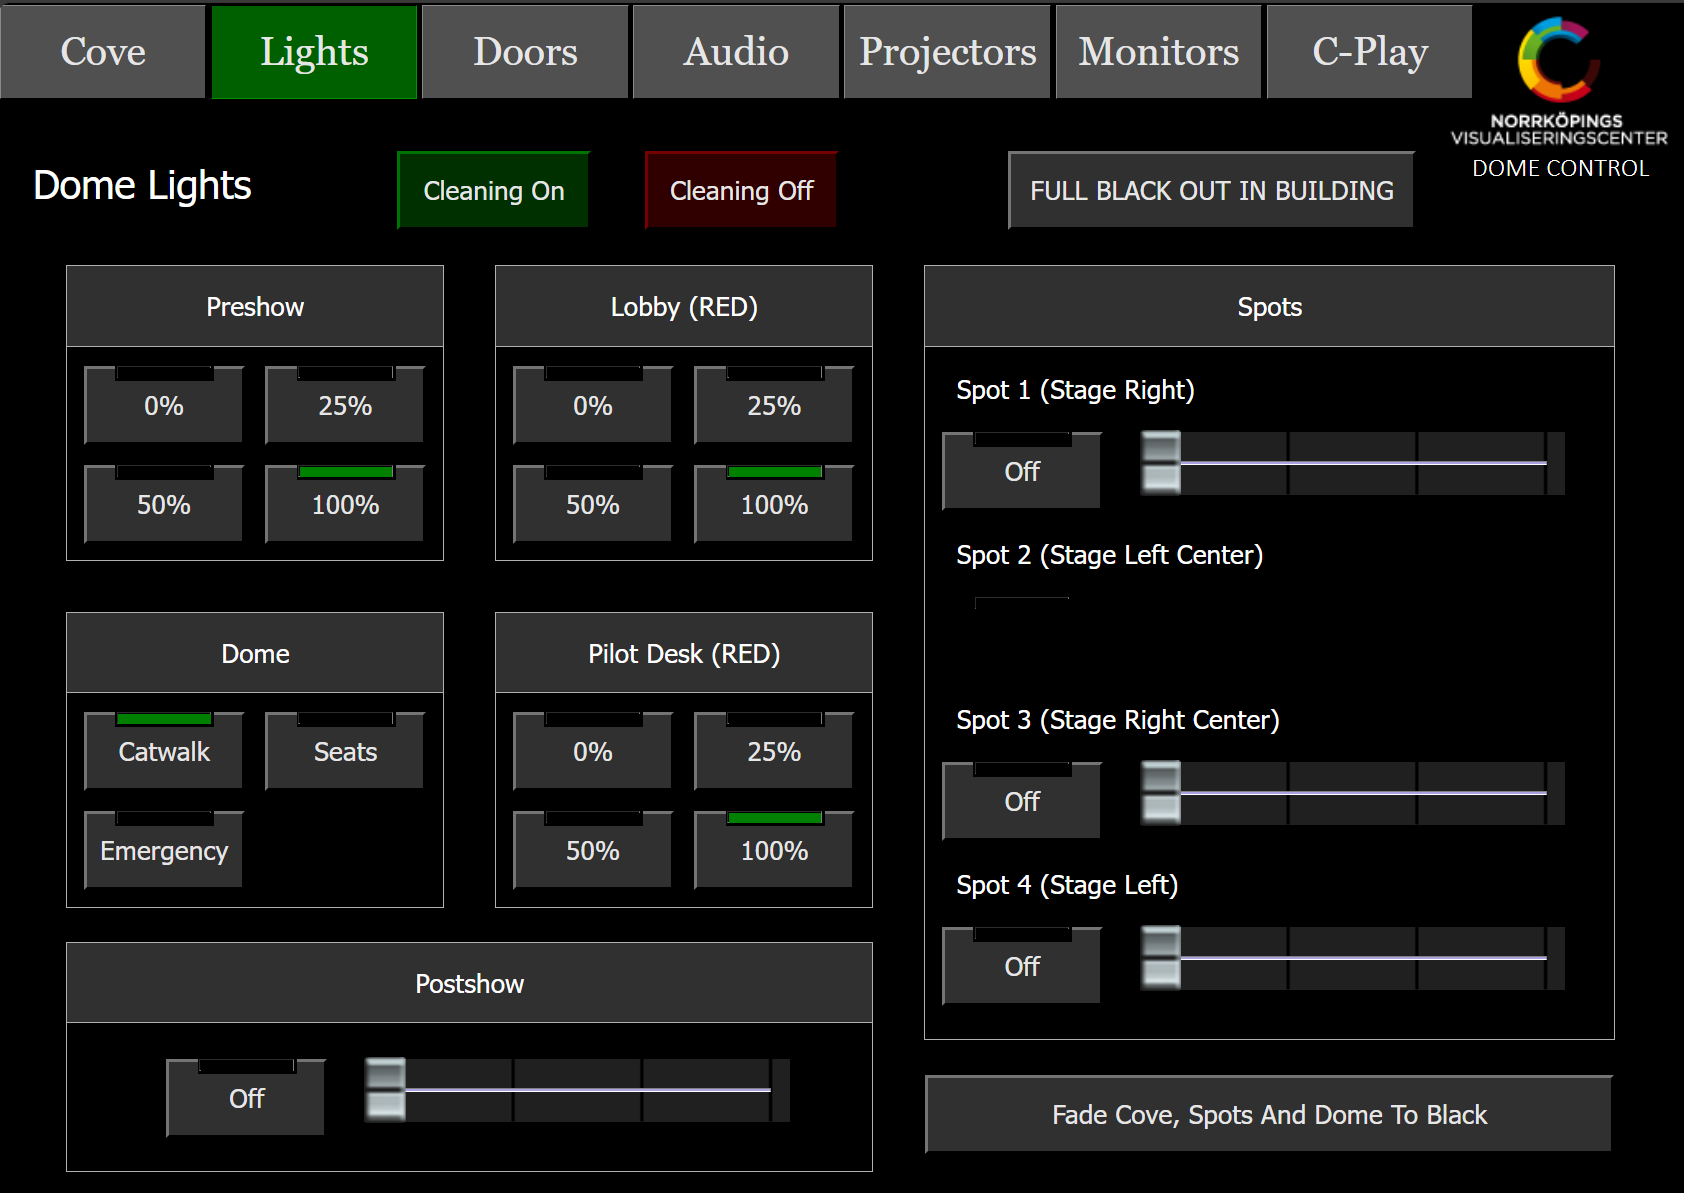
| Lights | All other lighting: seats, catwalk, pre/post-show, lobby, pilot desk, spotlights |
| Doors | Locking and opening of Preshow, Dome In, Dome Out and Postshow doors |
| Audio | Microphone faders, mute, background music, mixer snapshots |
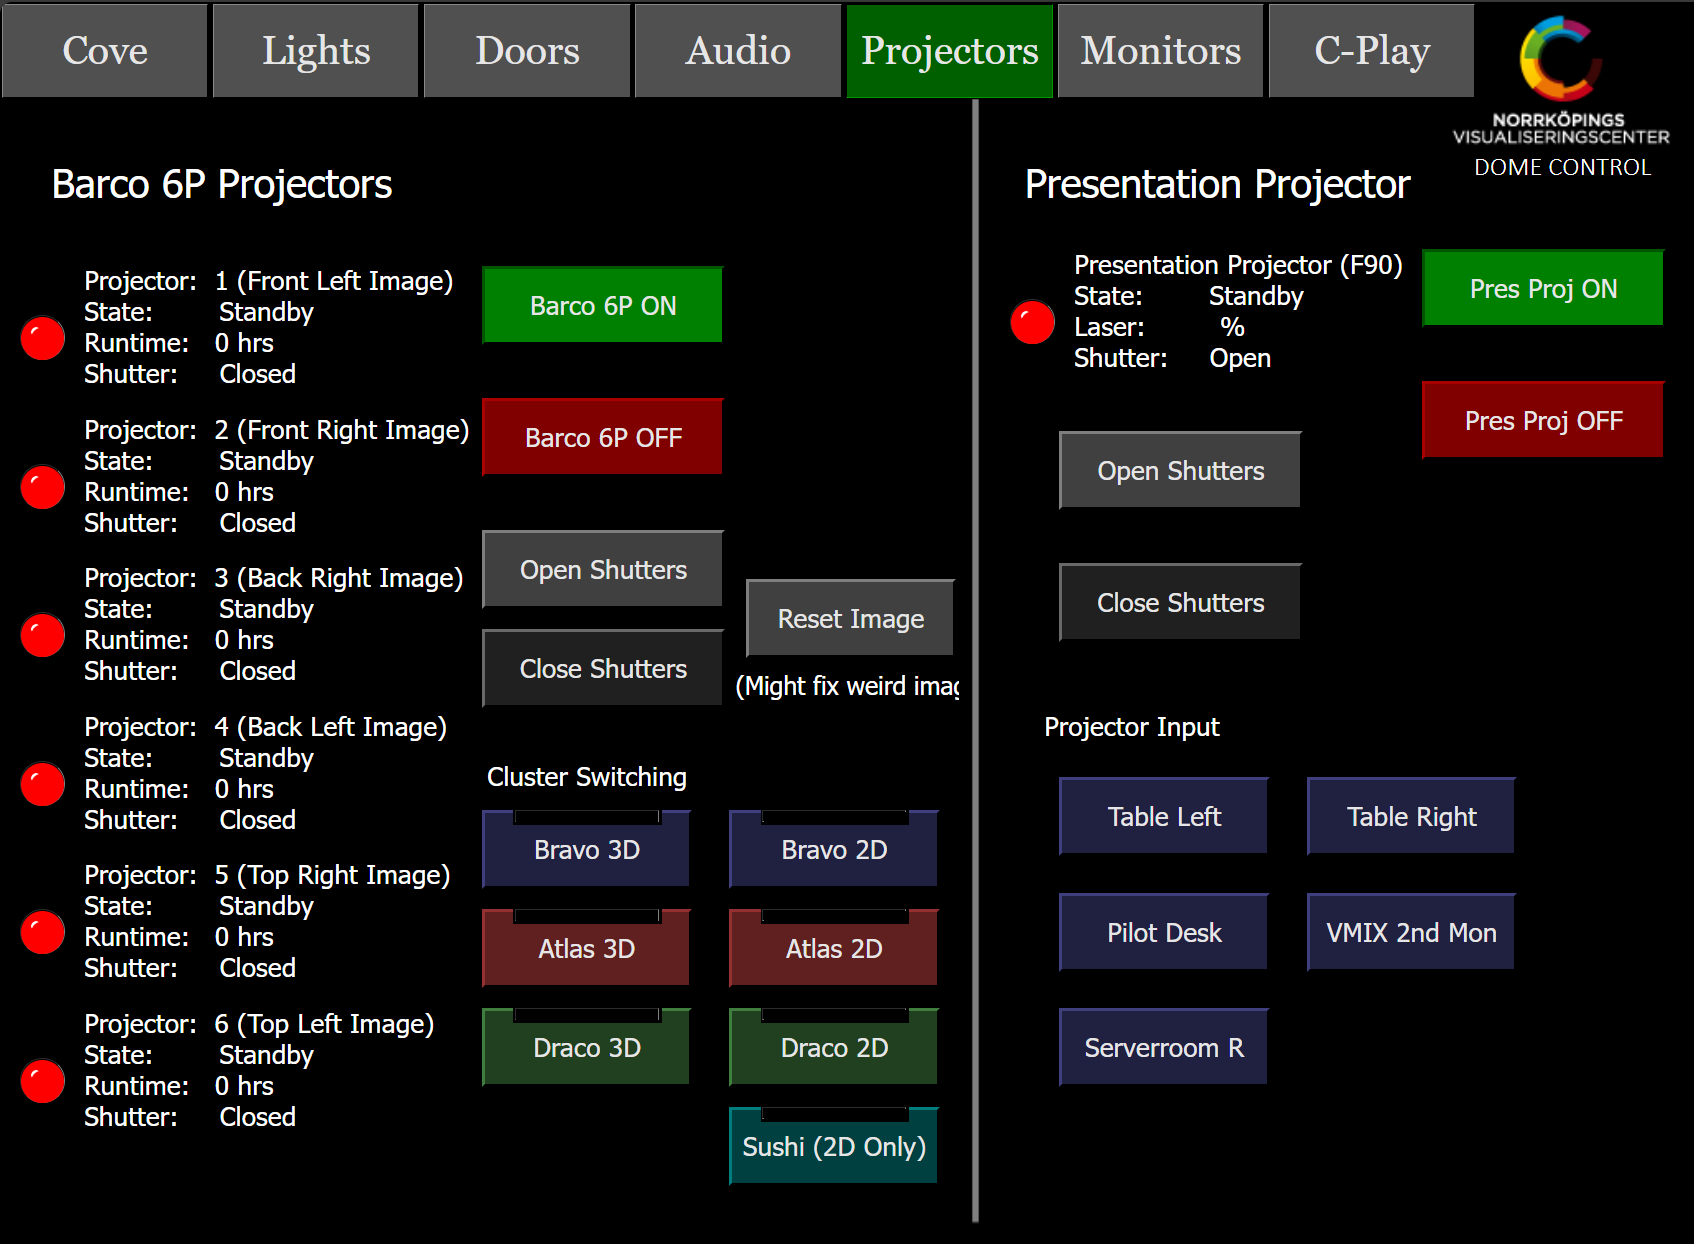
| Projectors | Barco 6P projectors, presentation projector, shutters, cluster switching |
| Monitors | Monitor and display routing |
| C-Play | Playlist, language, playback and film volume |
The C-Play application must be running on the left screen in the control booth before the C-Play tab on the iPad will work. The iPad drives that application; it is not an independent player.
1. Starting up
- Open the Projectors tab.
- For a film screening, press and hold
Barco 6P ON. For a presentation or conference, pressPres Proj ONinstead. - Wait until you hear the projectors click on — this can take about 10 seconds.
- Watch the status lamps on the left of the panel. They go red → amber → green. When all lamps are green the dome is ready for a test playback.
- If no image appears on the dome, press
Open Shutters. - If the image flickers at startup, or a projector shows an odd colour or a strange image,
press
Reset Image.
| Lamp | Projector state | Meaning |
|---|---|---|
| Red | Standby, shutter closed | Off |
| Amber | Conditioning or Ready, shutter closed | Starting up |
| Green | Laser On (typically 50–68 %), shutter open | Running |
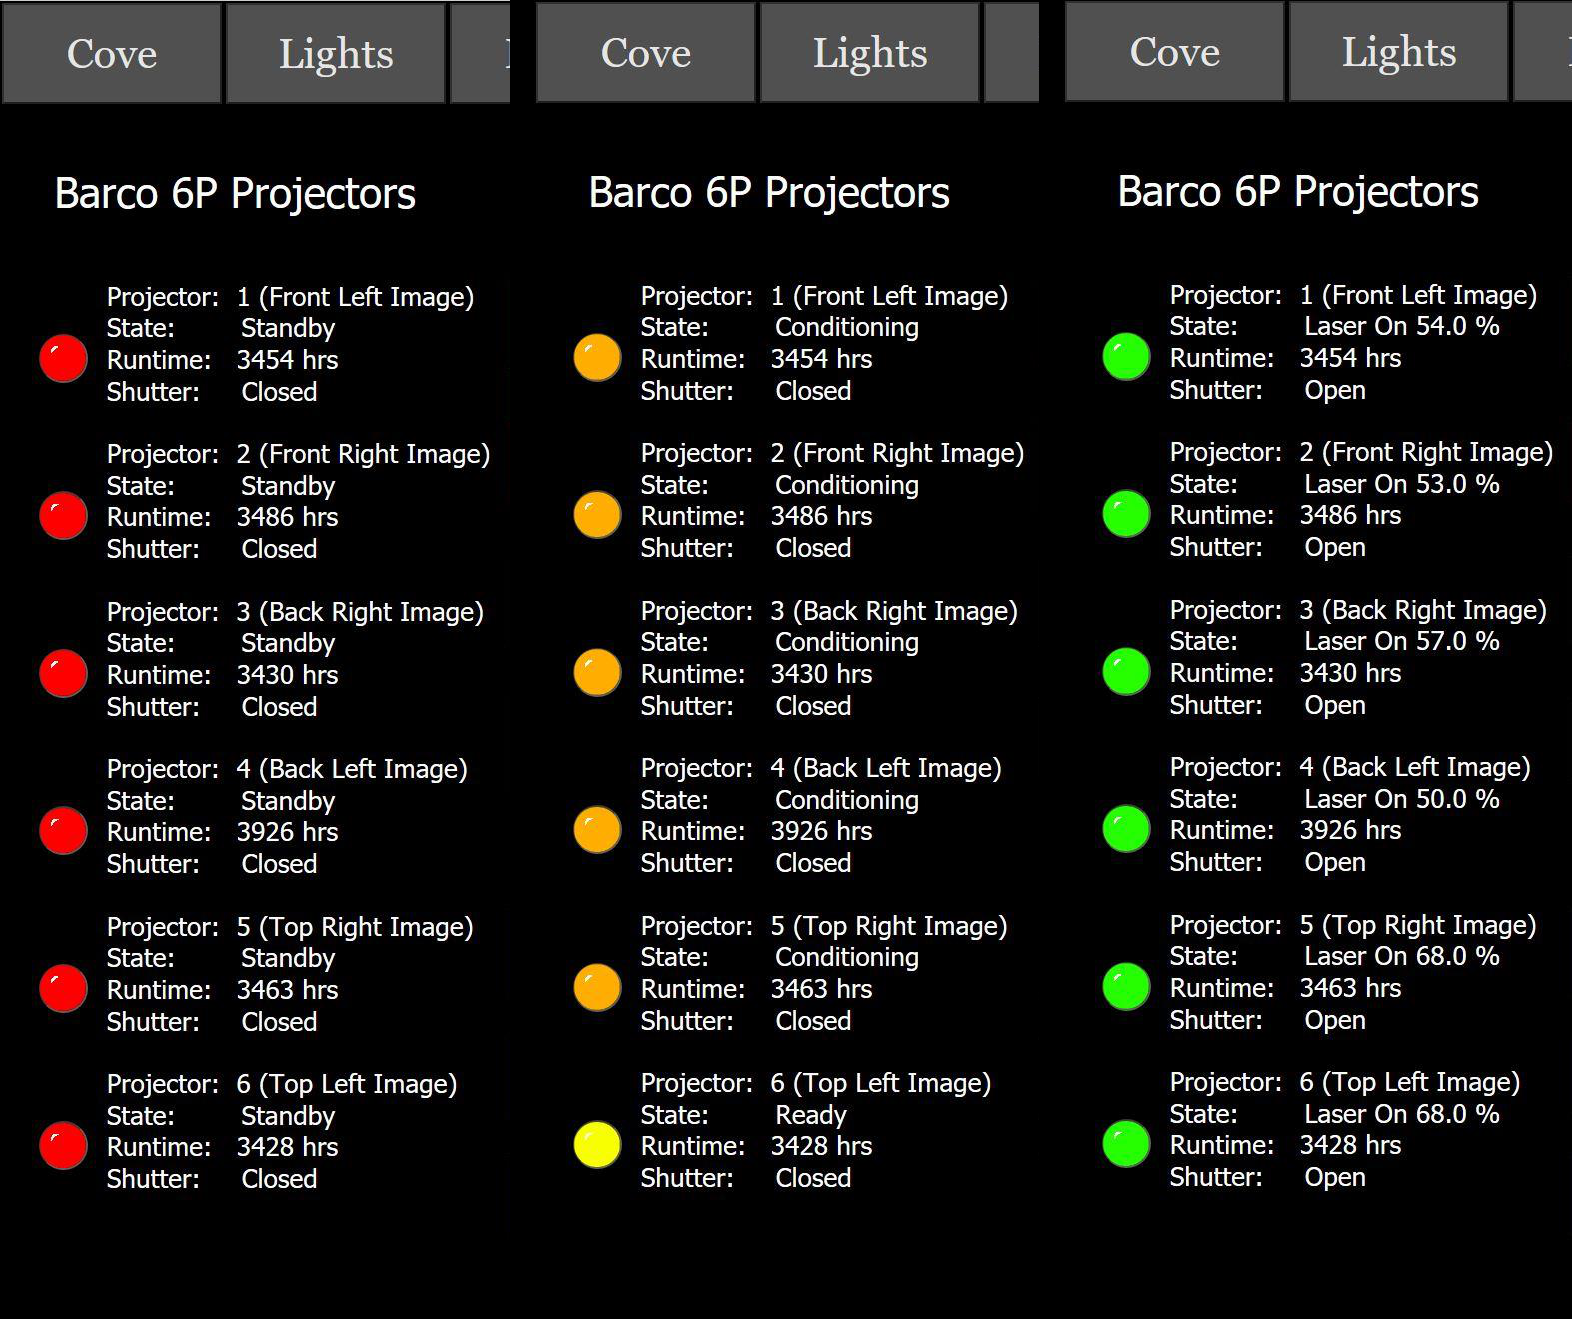
Left to right: off — starting up — running.
If any lamp is still red once startup has finished, or the image still looks wrong after
Reset Image — do not keep pressing buttons. Call C-tech, see
If something goes wrong.
Then start the C-Play application on the left booth screen and run a dome test from the iPad before anyone is let in.
2. Playing content — the C-Play tab
- Dome tests and film playback both run from the C-Play tab.
- Make sure the correct cluster is selected. The cluster selected on the booth screen
and on the iPad must be the same one. ATLAS is the default unless you have been told
otherwise. Clusters are switched on the Projectors tab:
Atlas 3D/2D,Bravo 3D/2D,Draco 3D/2D,Sushi (2D only). - Select the film in the Playlist and press
Load selected in playlist— for a test, use Domtest. - Once it has loaded, the available audio languages are shown. The original language is
always preselected; to change it, tap the language you want and press
Load selected audio. - Press
Show Playto start.Show Playautomatically fades down all lighting in the room. Use the plainPlaybutton when you do not want the lights to change. - Press
Stopto stop,Pauseto pause. - To lower the film volume during playback — for example at a conference or a school screening — use the slider on the right. Tap the slider rather than dragging it.
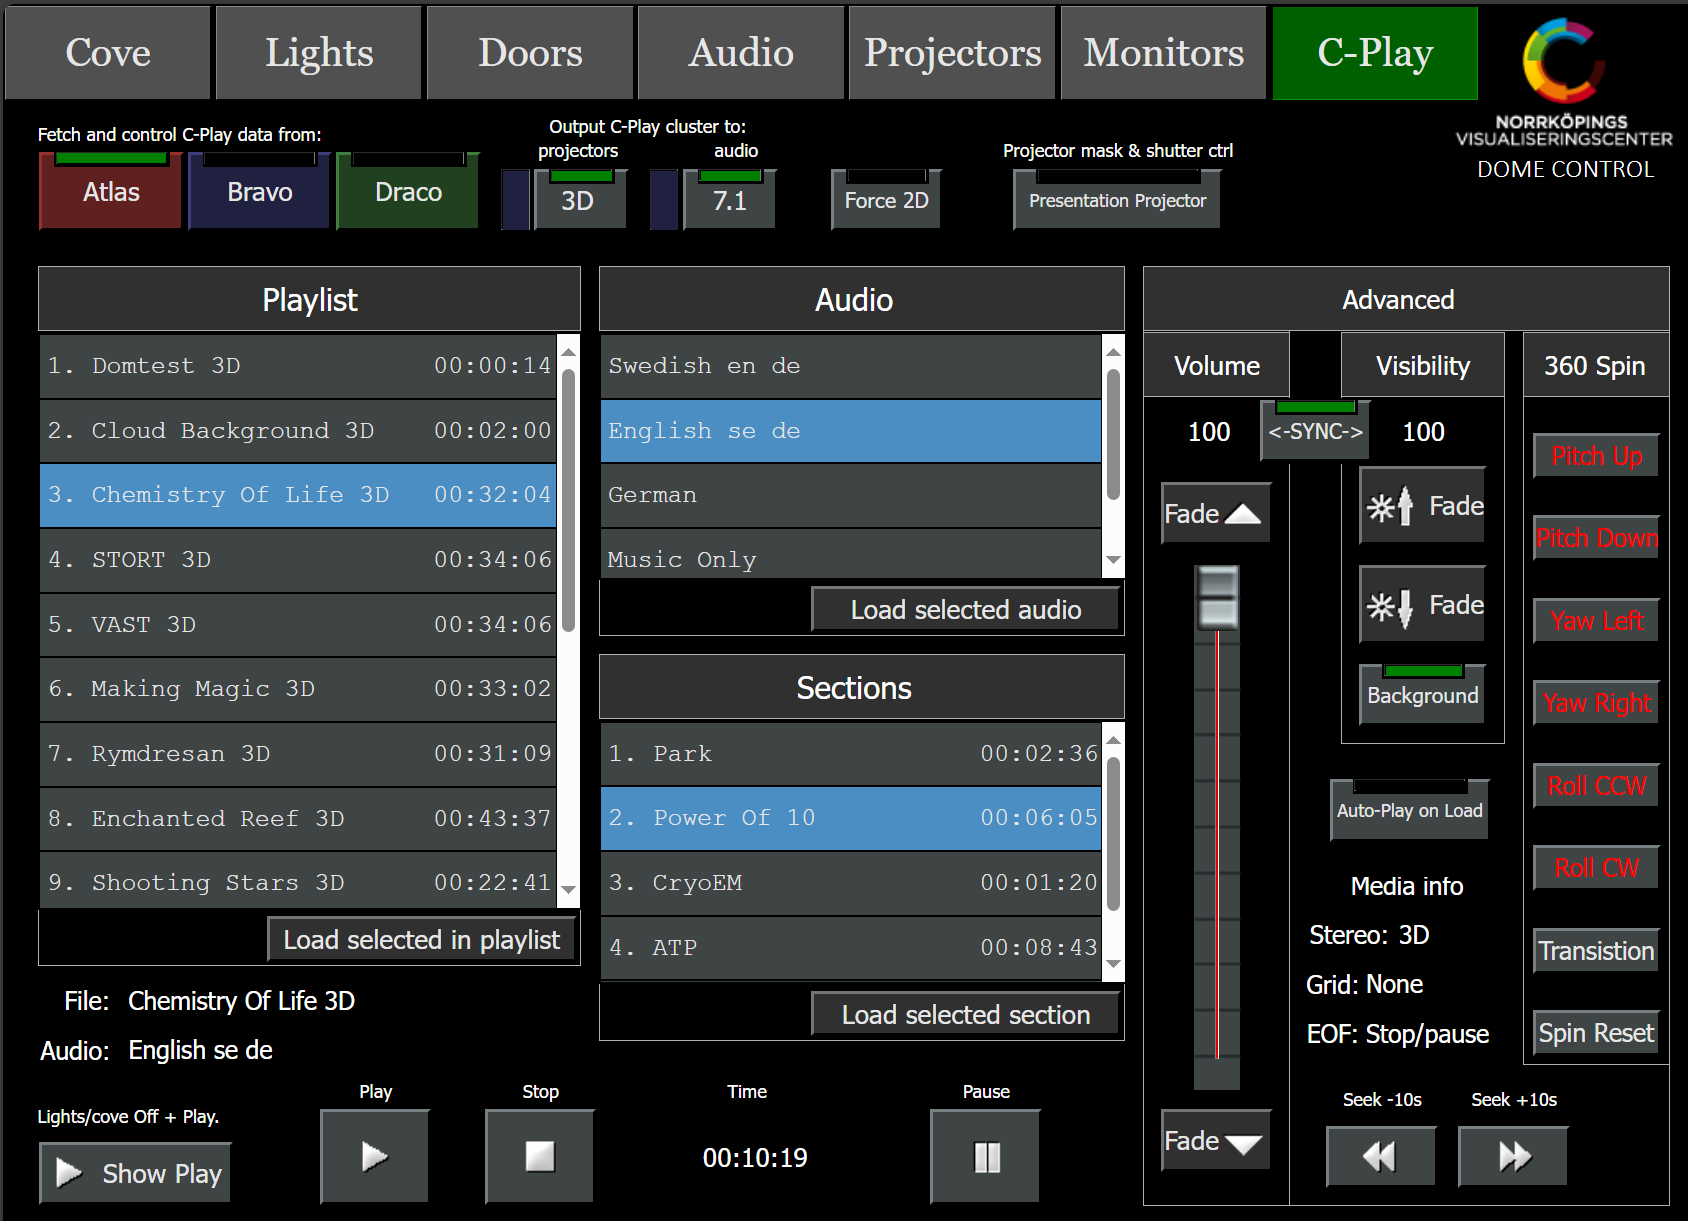
The film volume can also be set from the mixing desk, see Mixing desk.
3. Lighting
Cove — the dome surface itself
- Open the Cove tab.
- Choose coverage:
Full(whole dome),Half(half the dome) orNone/Black. - Choose a colour. Prefer a warm shade that is bright but gentle on the eyes — Peach is the standard choice. A custom RGB colour can also be set.
Everything else
Open the Lights tab:
| Control | Lights |
|---|---|
Seats | Seat lighting |
Catwalk | Behind the dome screen |
Preshow / Postshow | Entry and exit areas |
Lobby, Pilot Desk | Red-tinted, 0/25/50/100 % |
Spot 1–4 | Stage spotlights — use spots 3 and 4 for presentations and interactive sessions |
Emergency | Emergency exit sign |
- To black out for a film:
Fade Cove, Spots And Dome To Black. - To shut down all lighting for the day:
FULL BLACK OUT IN BUILDING.
4. Audio and microphones
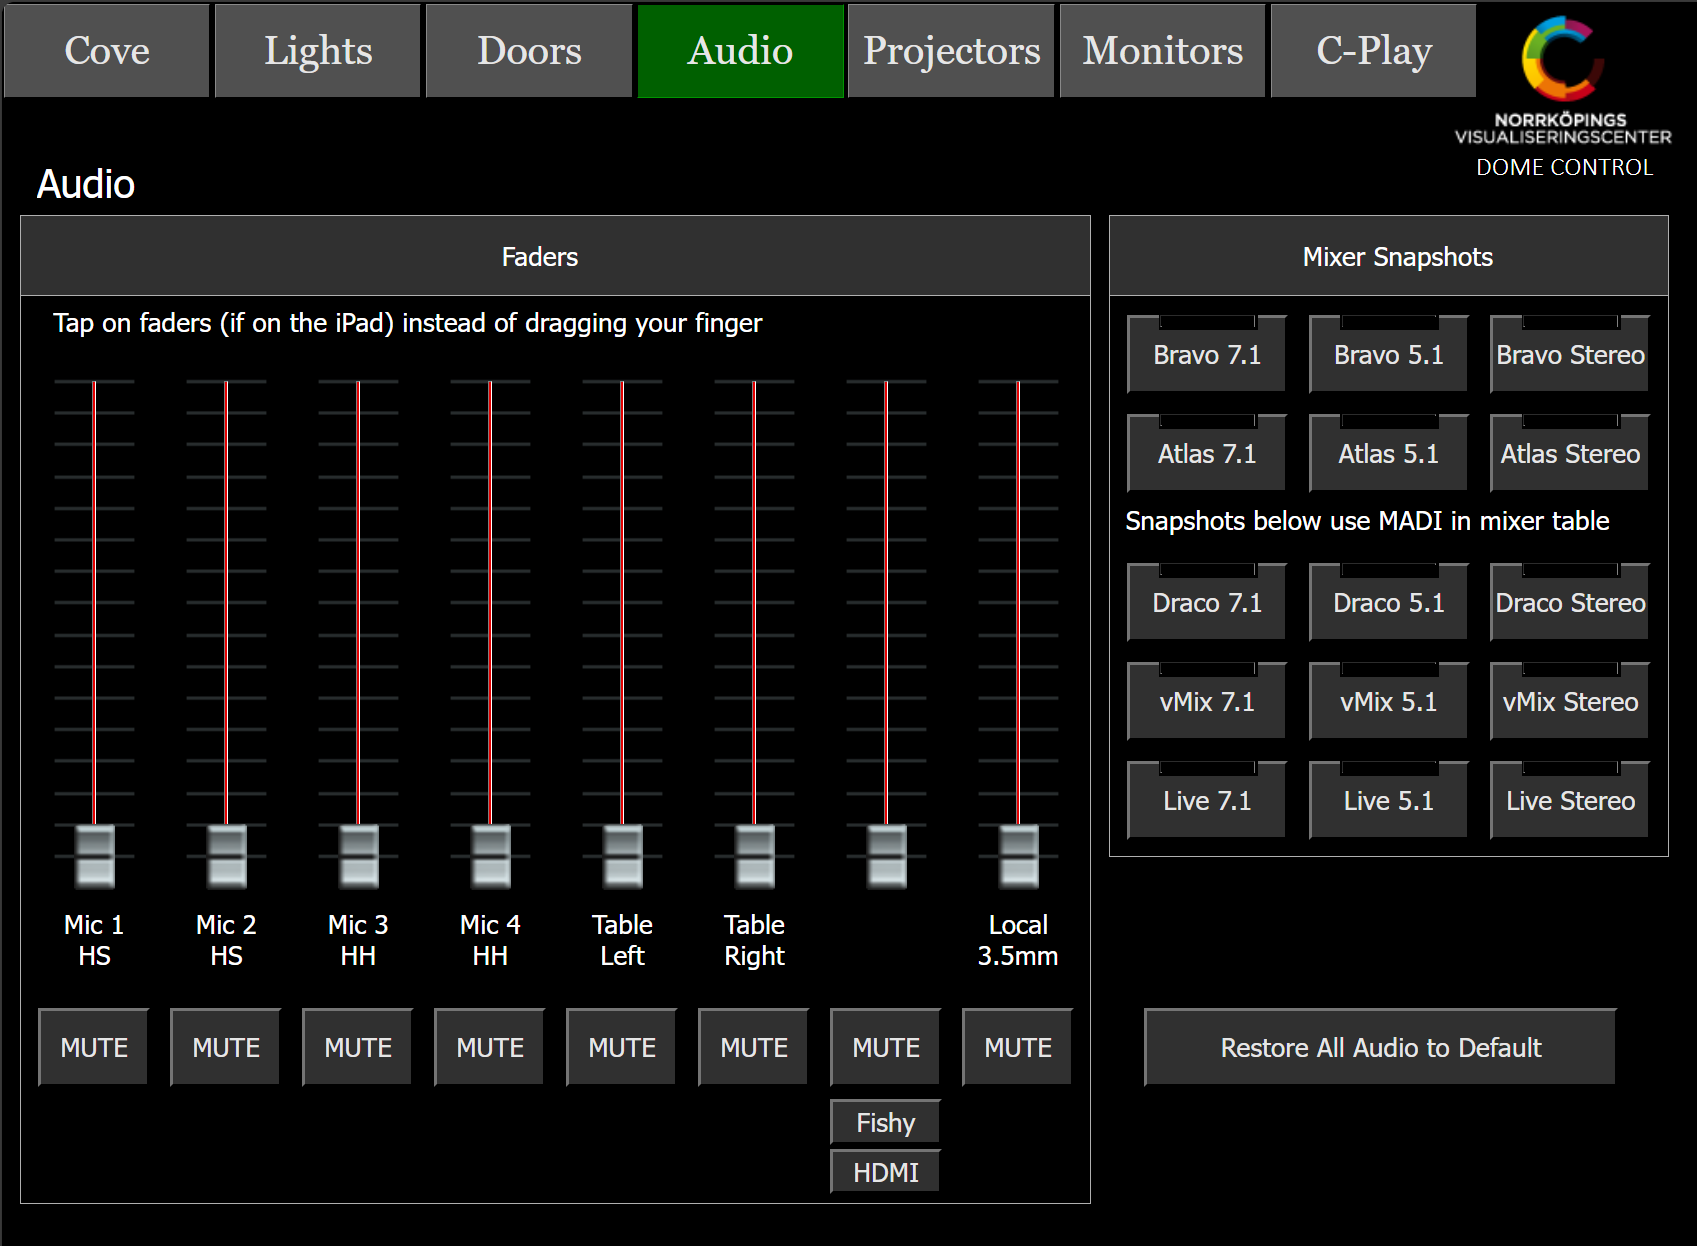
Open the Audio tab.
- Switch the microphone on with the small red button on the handheld unit, then find the
matching fader number under
Faders. - Turn
MUTEoff so it can be heard, and raise the level with the fader. - Tap the faders instead of dragging your finger along them.
| Fader | Microphone |
|---|---|
| Mic 1, Mic 2 | Headset / lavalier ("HS") |
| Mic 3, Mic 4 | Handheld ("HH") — best for a short presentation |
| Mic 6 | Works only via the mixing desk |
Always press MUTE on the panel or the mixing desk before you switch a microphone off.
Check that all channels are muted before a microphone is switched on, too.
- Film sound is enabled with the mixer snapshot for the cluster in use —
Atlas 7.1, orBravo 7.1if you are running on Bravo. The snapshots below those (Draco, vMix, Live) use MADI in the mixer desk. - Background music for admission and dismissal is the
Localfader. Restore All Audio to Defaultreturns the faders to their normal state.
Translation receivers
Visitors who want another language use the tour guide receivers in the rack under the mixing desk, on the left.
- Pull a receiver out of its holder.
- The up/down arrows select the language frequency — English is always first.
- The wheel sets the volume.
- Available languages differ per film; see the separate language list.
5. Mixing desk
Prefer the iPad for everything below — the desk is the fallback.
- Film volume: the
ATLASfader, in the row of faders at the bottom right of the desk, first fader from the left. - If
ATLASis not shown, press the round silver button second from the bottom on the right of the desk. That switches which functions the faders are assigned to. - Microphones and other audio: the faders at the bottom left of the desk.
6. Doors
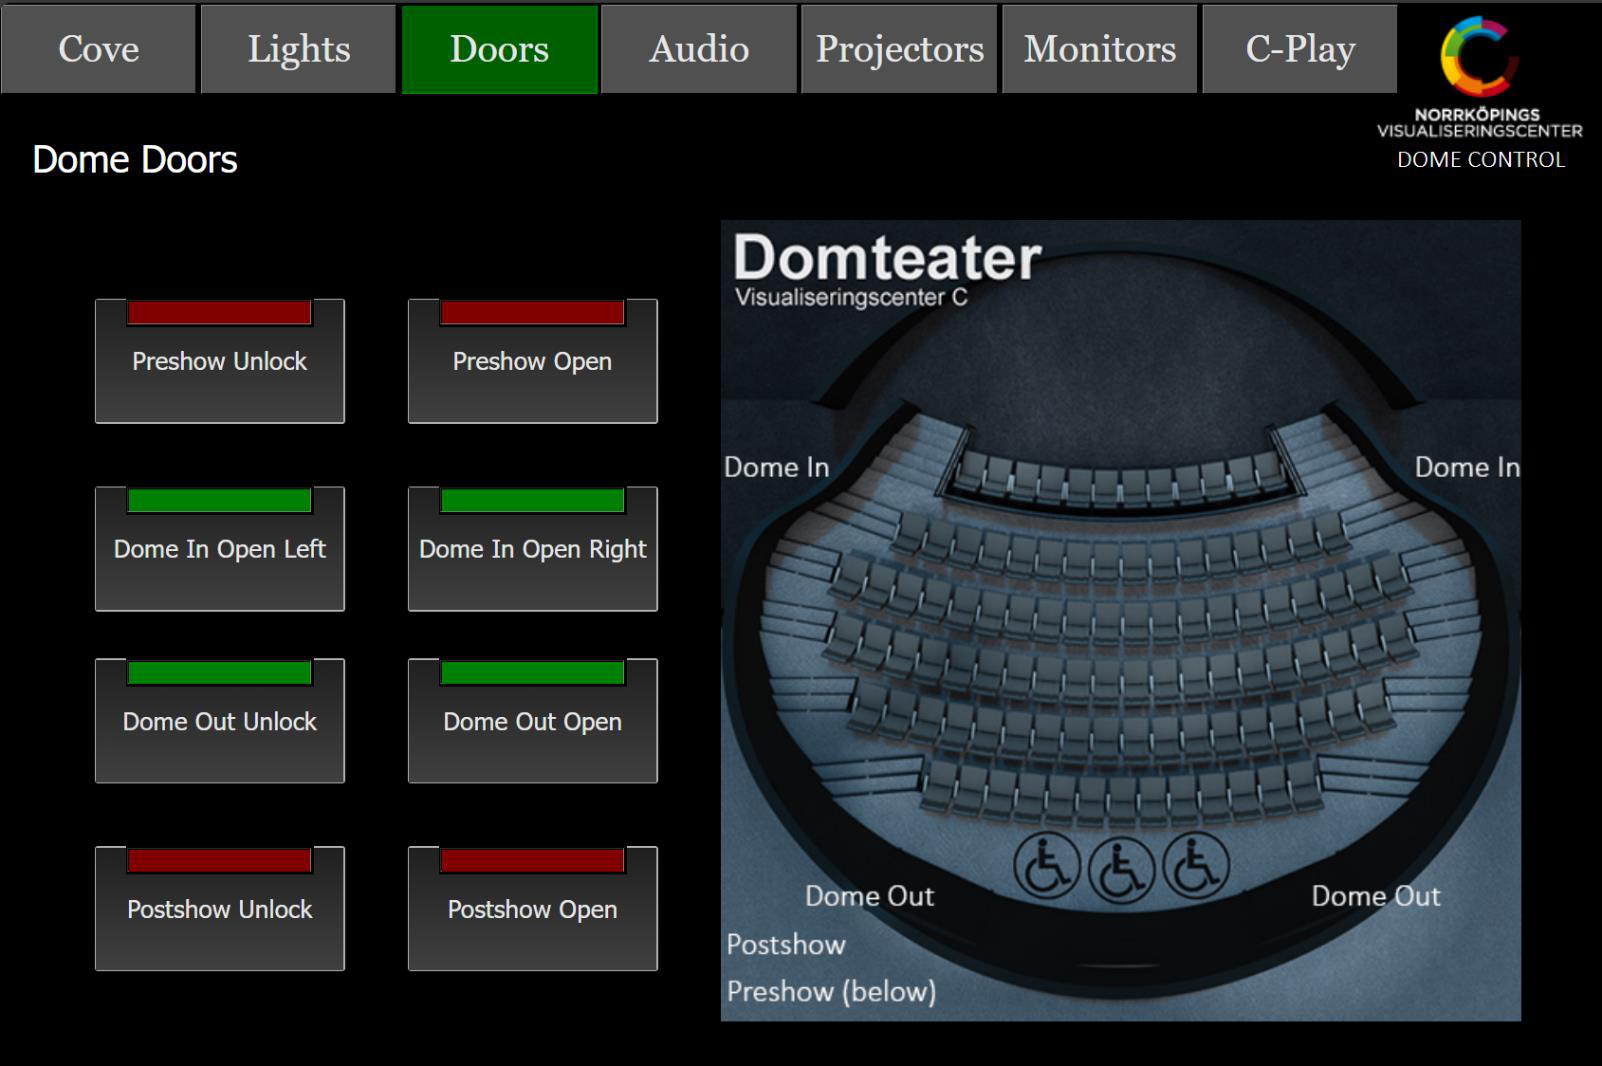
Open the Doors tab. A button lights green when that door is open.
| Direction | Buttons | Doors |
|---|---|---|
| In — the audience always enters via Preshow | Preshow Unlock + Preshow Open | Outer large doors |
Dome In Open Left / Dome In Open Right | Inner doors, lower level | |
| Out — the audience always leaves via Postshow | Postshow Unlock + Postshow Open | Outer glass doors |
Dome Out Unlock + Dome Out Open | Inner doors, upper level |
All doors must be unlocked but closed while a show is running.
7. Stereo (3D) sessions
The dome uses 6P RGB laser separation: each primary is split into two wavelengths, and passive glasses filter one set to each eye. Practical consequences for an operator:
- The glasses are wavelength filters, not shutters — nothing to charge, pair or change batteries in, and they can be washed in the dishwasher. They are expensive and easily scratched, so count them out and count them back in.
- Content must actually be stereo, and the cluster must be in the matching mode
(
Atlas 3DversusAtlas 2D). Playing mono content in a stereo mode looks flat but sharp; playing stereo content in a mono mode looks doubled or ghosted. - If the audience reports ghosting, check the playback mode before suspecting the projectors.
8. If something goes wrong during a show
Your priority with an audience present is a presentable room, not a diagnosis. Do the diagnosis afterwards using Troubleshooting.
| Symptom | Do this now |
|---|---|
| One projector channel goes black | Continue. A single missing channel is survivable; do not restart anything mid-show. Note which channel. |
| All channels go black, projectors still on | Bring up house lights, check the playback application first — it is usually the content or the render node, not the projectors. |
| Image is doubled or ghosted in a 3D show | Check that playback and cluster are in the correct stereo mode before touching the projectors. |
| Image flickers or a projector shows odd colours | Press Reset Image on the Projectors tab. |
| No image at all although the projectors are green | Check the shutters — press Open Shutters. |
| Audio drops | Check the mixer snapshot, source and mute state; fall back to a laptop feed if necessary. |
| Everything goes dark including lights | Treat as a power event. Do not start pressing PDU buttons. Get the audience safe, then escalate. |
| A projector alarms audibly / chiller alarm | Note which projector, do not power-cycle it mid-show; escalate after the session. |
Do not power-cycle a projector, do not cut a PDU outlet, and do not restart a render cluster while an audience is in the room. A projector interrupted mid-cooldown may refuse to restart, turning a one-channel problem into a cancelled show.
If anything does not work, or looks or sounds "odd" during a test playback, call C-tech on the duty phone: 011 – 36 36 11. See also Escalation and contacts.
If the session genuinely cannot continue, bring up house lights, tell the audience plainly, and call the on-call technician.
9. Shutting down
Only do this after the last session — between sessions, leave the projectors running.
- When everyone has left the auditorium, check that nothing has been left behind under the seats, and that no visitors remain in Preshow, Postshow or the toilets. Then close and lock Preshow and Postshow.
- Close the
Shuttersfor the projectors on the Projectors tab. - Close the Dome In and Dome Out doors before you leave the auditorium.
- Check the 3D glasses — do they need washing, and are there enough for the next session? If this was the last session of the day, there is no other booking for the room in Smartbook, and no glasses need washing for tomorrow, switch the dishwasher off.
- Last of all, turn the projectors off from the iPad — but only if the dome is not booked after your session.
- Press
FULL BLACK OUT IN BUILDINGon the Lights tab, set the audio track toMute, check that all doors are closed and locked, and leave through Postshow. - Note anything unusual — even something that "fixed itself" — in the appropriate place.
10. Handover notes
If you are handing the room to another operator, tell them: which cluster and content is currently loaded, any channel or device that is behaving oddly, and whether the glasses have been counted back in.